Our Take on OpenCV (for SOTR Challenge)
OpenCV is fun. It looked scary before we tried it but when we did, it turned out to be much easier than we anticipated. Shame we didn't start with it sooner (and by sooner I mean for last year's competition). Our rovers were equipped with Raspberry Pi cameras since day one. The idea was to use them for follow the line challenge, for recording and first person driving - none of which really worked well due to lack of time to spend on it. Now, for the Somewhere Over the Rainbow challenge, we finally made a use of it!
Setting Up the Picture
We read a few tutorials online and decided to go with an HSV picture as a base for image analysis. Our rovers have a camera service that delivers 'raw' byte data of an image in RGB format directly from the camera and delivers it to all interested parties over MQTT. That allows us not only to break the code to smaller chunks and make services where code provides access to hardware or software resources, but also to easily implement a monitor of what is really happening to the rover at any time.So, as soon as we receive image we prepare it to be used in OpenCV:
pilImage = toPILImage(message)
openCVImage = numpy.array(pilImage)
results = processImageCV(openCVImage)
...
Next is to blur image a bit and convert it to HSV components inside of OpenCV:
blurredImage = cv2.GaussianBlur(image, (5, 5), 0)
hsvImage = cv2.cvtColor(blurredImage, cv2.COLOR_RGB2HSV)
hueChannel, satChannel, valChannel = cv2.split(hsvImage)

pyroslib.publish("overtherainbow/processed", PIL.Image.fromarray(cv2.cvtColor(hueChannel, cv2.COLOR_GRAY2RGB)).tobytes("raw"))
pyroslib.publish("overtherainbow/processed", PIL.Image.fromarray(cv2.cvtColor(valChannel, cv2.COLOR_GRAY2RGB)).tobytes("raw"))
pyroslib.publish("overtherainbow/processed", PIL.Image.fromarray(cv2.cvtColor(satChannel, cv2.COLOR_GRAY2RGB)).tobytes("raw"))

Finding Contours
The following step was one of the most important that we spend lots of time on tweaking, but at the end, the solution ended up relatively simple. Also, recompiling OpenCV with NEON and FVPV3 optimisations helped - a lot!
The problem is finding the right channel to apply the threshold and the right threshold value to nicely select the balls on the black background. The main issue was that with lots of light, the saturation channel was quite noisy as colour was found everywhere, while the value channel was really nice. In lower light conditions, value channel was not that useful, while saturation channel was jumping up and down yelling 'pick me'!
The algorithm we used goes something like this:
- combine saturation and value channels with some weights (current values are: 0.4 for saturation and 0.6 for value)
- start with value for threshold of 225 (25 less of 250 which is nearly at the top)
- find contours
- sanitise contours
- check if the correct number of contours was detected (i.e. more than 0 and less than many)
- if not, drop the threshold value by 25 and repeat from step 3
With that we can see slowly how ball is forming at the middle of the picture.
Here's the code:
gray = sChannel.copy()
cv2.addWeighted(sChannel, 0.4, vChannel, 0.6, 0, gray)

threshLimit = 225
iteration = 0

while True:
thresh = cv2.threshold(gray, threshLimit, 255, cv2.THRESH_BINARY)[1]
iteration += 1

cnts = cv2.findContours(thresh, cv2.RETR_EXTERNAL, cv2.CHAIN_APPROX_SIMPLE)
cnts = cnts[1]

initialCntNum = len(cnts)
sanitiseContours(cnts)

pyroslib.publish("overtherainbow/processed", PIL.Image.fromarray(cv2.cvtColor(thresh, cv2.COLOR_GRAY2RGB)).tobytes("raw"))

if 0 < len(cnts) < 6:
  log(DEBUG_LEVEL_ALL, "Found good number of areas after " + str(iteration) + " iterations, contours " + str(len(cnts)))
  return cnts, thresh

if threshLimit < 30:
  log(DEBUG_LEVEL_ALL, "Failed to find good number of areas after " + str(iteration) + " iterations")
  return cnts, thresh

threshLimit -= 25
As you can see finding the contours was already a given function of OpenCV. Here are the steps our rover did finding green colour:

Sanitising Contours
We know we are searching for a ball. Round contour. Or something that looks round to human eye. Even young moon looks quite round as our brain fill in the gaps. And that problem of a young moon - area of the ball where too much light reflects or where there is not enough light is preventing us to use simple a 'find circle' in each contour. So, we went on checking contours radius (radius of minimal circle that can be drawn over the contour) and area:
for i in range(len(cnts) - 1, -1, -1):
  center, radius = cv2.minEnclosingCircle(cnts[i])
  area = cv2.contourArea(cnts[i])
  if radius = 128:
    del cnts[i]
Since our camera is at the back of the rover, the lower half of the picture is the rover itself, so all contours at that area are immediately ignored (centre > 128).
MIN_RADIUS, MIN_AREA and MAX_AREA are fetched from real life running of the code for a given resolution, position of the camera and rover given size of arena, etc... And a fudge factor of 0.7!
MIN_RADUIS = 8
MIN_AREA = MIN_RADUIS * MIN_RADUIS * math.pi * 0.7
MAX_AREA = 13000.0
Processing Results
After we have found contours on the picture we needed to find a colour of area of the contour. First we use contour to make a mask and apply it to hue channel (only look at the pixels inside of the contour.
Now the colour itself. Seems easy but it wasn't. Remember the young moon? Our brain immediately makes it into a full circle - filling in the gaps. If a ball is recognised for less then half of the area of the circle, and colours vary (red and yellow are quite close to each other) it is a problem finding out what exactly the colour is. Taking average skews the results so we decided to take a histogram of all colours and pick the most predominant. And it seems to be working well:
mask = numpy.zeros(hChannel.shape[:2], dtype="uint8")
cv2.drawContours(mask, [contour], -1, 255, -1)
mask = cv2.erode(mask, None, iterations=2)

maskAnd = hChannel.copy()
cv2.bitwise_and(hChannel, mask, maskAnd)

pyroslib.publish("overtherainbow/processed", PIL.Image.fromarray(cv2.cvtColor(maskAnd, cv2.COLOR_GRAY2RGB)).tobytes("raw"))

hist = cv2.calcHist([hChannel], [0], mask, [255], [0, 255], False)

value = numpy.argmax(hist)

if value  145:
  return "red", value
elif 19 <= value <= 34:
  return "yellow", value
elif 40 <= value <= 76:
  return "green", value
elif 90 <= value <= 138:
  return "blue", value
else:
  return "", value
Here it is when colour is spotted and mask applied to the hue channel: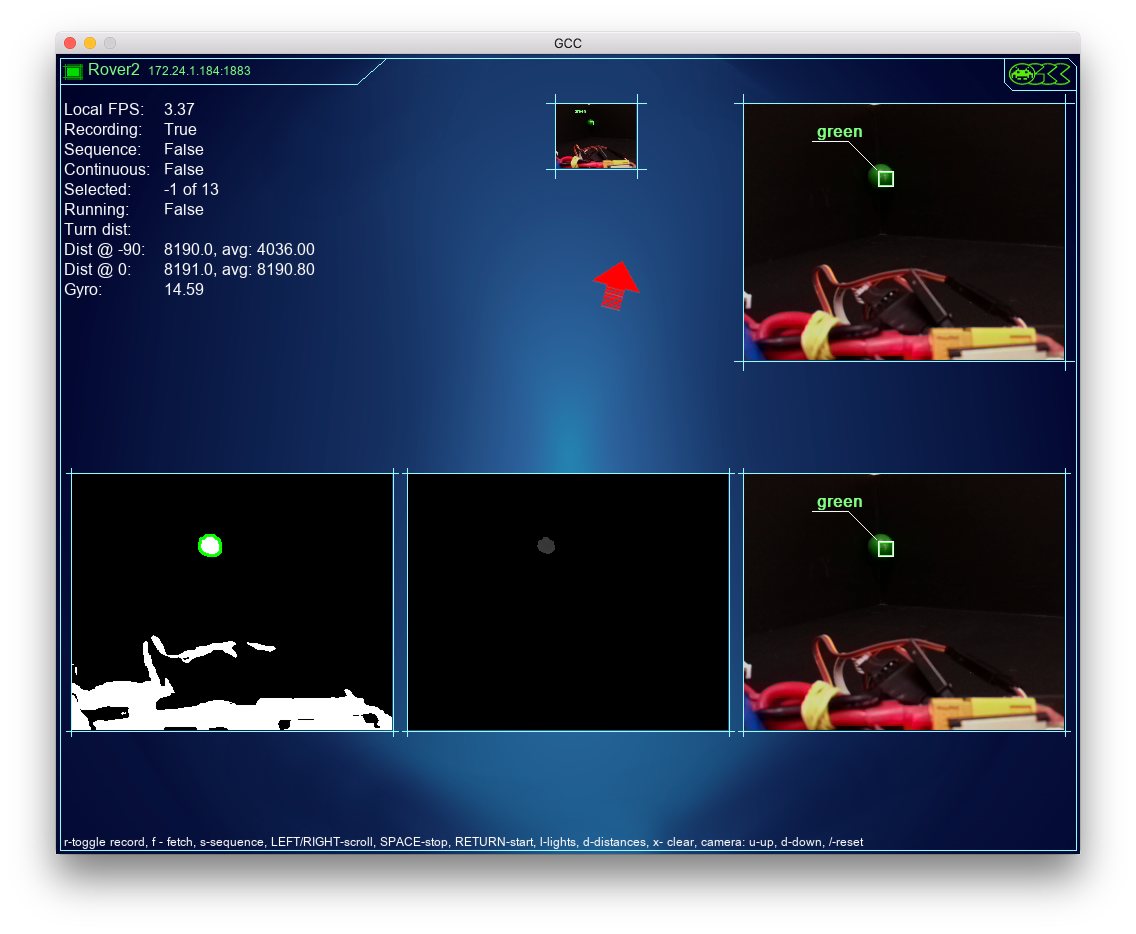 The left image is of the found contour, middle of mask applied to the hue channel (see above what hue was looking like as complete) and last image is the result... well, for looks!
The rest is for the main Somewhere Over the Rainbow agent to process the recognised colours. When there is only one we take it as it is. When there are more than one coloured balls recognised we check if any of them are red and if so discard them as they are usually mainly from the noise of the background. If still undetermined - we take more pictures and process more. Speaking of red - red and yellow we take multiple takes of reading picture as camera's adaptive lighting can change over several frames and produce better results. For green and blue this are far more deterministic...
Here it is when all was put together:
Comments
Comments powered by Disqus