Software Part 1
Then
When all servos and motor controllers (that are to be commended as servos) were wired, we needed a way to control them in the software. Luckily, Raspberry Pi has brilliant piece of software called 'servoblaster' (open source project on the github) which utilizes internal DMA timers for generating precise PWM they way the servos need. Also, it pretends to be a device by creating a pipe file called /dev/servoblaster which acts as simple interface with the 'outside' world. All that is needed, is for someone to a send line of text in format "<servo_number>=<position>" and servoblaster will move a particular servo to the position. The servos are numbered 0, 1, 2... and in /etc/init.d/servoblaster file we can define OPTS environment variable with "--p1pins=<comma delimited list of GPIO pins>" to link between ordinary number and GPIO pin. GPIO pin numbers correspond to physical pins which makes it even simpler. The servo position is the width of the signal in tens of microseconds, so, 150 corresponds to 1.5ms (1500 micro seconds) which is mid point of servos. We decided to numerate the servos like this:- servo 0 -> front right motor controller
- servo 1-> front right steering servo
- servo 2 -> front left motor controller
- servo 3-> front left steering servo
- servo 4 -> back right motor controller
- servo 5->back right steering servo
- servo 6 ->back left motor controller
- servo 7->back left steering servo
#!/bin/bashWith that we'd completed the most important part of this project: our rover came to life!straighten wheels
echo >/dev/servoblaster "1=150" echo >/dev/servoblaster "3=150" echo >/dev/servoblaster "5=150" echo >/dev/servoblaster "7=150"
drive forward
echo >/dev/servoblaster "0=180" echo >/dev/servoblaster "2=120" echo >/dev/servoblaster "4=180" echo >/dev/servoblaster "6=120"
sleep 2
stop
echo >/dev/servoblaster "0=155" echo >/dev/servoblaster "2=155" echo >/dev/servoblaster "4=155" echo >/dev/servoblaster "6=155"
Next, is to code this in Python!
Now
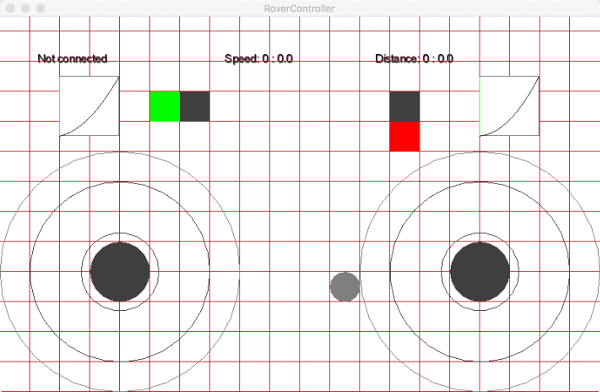
Over the weekend (and partly over the whole half term) we did two important steps: released Android application to drive the rover and made an adapter for a wire coathanger for our local PiNoon. Next Wednesday (tomorrow) we are going to have a party! 60 balloons are ready and rules set: whoever loses the round is responsible for blowing next balloon up!The android application is written in LibGDX in Java, so, as such, it can happily run on any PC (Windows, Linux or Mac) and be deployed as an android application or even as an iOS application! Application itself utilizes two point touch - one for the left and another for the right joystick.

The left joystick controls the rover's rotation and right forward/side movements. There are three modes:
- only right joystick is used -> the rover keeps orientation,
- forward/back is used on right joystick and left/right on left joystick -> the rover goes forward/back and turns more or less depending on left joystick
- only left joystick is used -> the rover rotates on the spot

Now, having app and joystick and several Android devices (phones and tables) we can drive all our three rovers at the same time! Youtube videos are to follow...
Comments
Comments powered by Disqus